Create Custom Schema
Use this guide when no Library Schema matches your Alert Producer payload.
By the end, you should have:
- one Alert Schema created from a real Alert Event
- useful extracted Fields
- stable Fingerprint Fields
- a working Alert Producer Destination
- one test Alert Instance visible in 1stLine
Example payload
This guide uses a simple JSON alert example.
{ "title": "CPU high on checkout-api", "status": "firing", "description": "CPU is above 90% for 5 minutes.", "labels": { "service": "checkout-api", "team": "payments", "priority": "P1", "instance": "prod-1" }, "links": { "runbook": "https://example.com/runbooks/cpu", "dashboard": "https://example.com/dashboards/checkout-api" }, "startedAt": "2026-05-25T12:00:00Z"}For this payload, a useful schema should extract:
titlestatusdescriptionlabelslabels.servicelabels.teamlabels.prioritylabels.instancelinks.runbooklinks.dashboard
Good Fingerprint Fields for this example are labels.service and labels.instance.
Bad Fingerprint Fields are startedAt or any timestamp-like value because they can change on every Alert Event.
Before you start
You need:
- access to 1stLine
- permission to create or edit Alert Schemas
- one Alert Producer that can send a test alert
- one Alert Receiver destination where 1stLine should forward alerts
- one representative alert example
Choose the most representative example you can. It should include the fields you want to use later for Conditions, Fingerprint Fields, mappings, and transformations.
Create the schema from an example
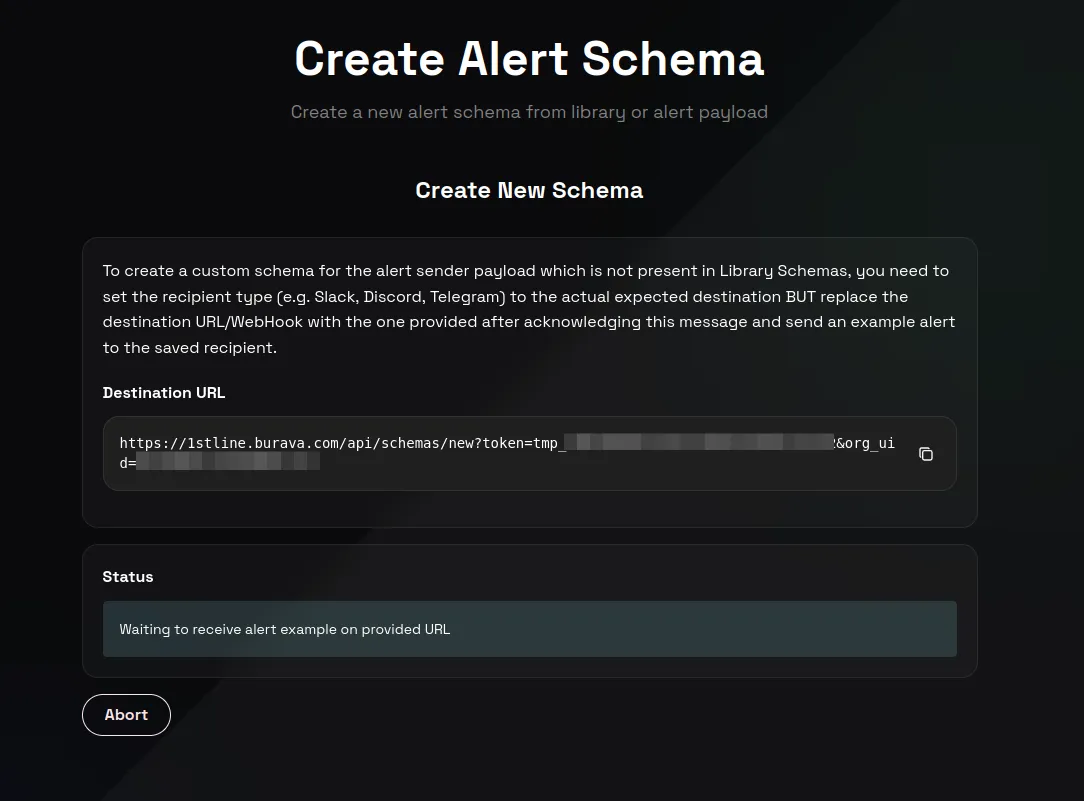
- Open Create Alert Schema.
- On Choose Schema Source, choose Create New Schema.
- Click Create New Schema.
- Read the setup message and click Got it.
- Copy Destination URL.
- In your Alert Producer, temporarily replace the receiver destination with that Destination URL.
- Send one representative alert example.
- Wait for Schema created successfully!
- Review the generated Alert Schema details.
During this flow, 1stLine waits for one alert example. You may see:
- Waiting to receive alert example on provided URL
- Alert example received, processing schema…
- Schema created successfully!
- Schema creation aborted
- Token expired. Please create a new token.
If the token expires, start again. Schema Creation Tokens are short-lived setup tokens.
After you choose Create New Schema, 1stLine gives you a temporary Destination URL. Put that URL in the Alert Producer only long enough to send one representative example.
Review the generated Fields
Open Schema Config and review Fields.
For the example payload above, confirm that Fields include the values you need for routing and response:
titlestatusdescriptionlabelslabels.servicelabels.teamlabels.prioritylabels.instancelinks.runbooklinks.dashboardIf important fields are missing, update Patterns and test extraction before continuing.
Automatic extraction is a starting point, not proof that the schema is ready.
Review Patterns
Use Patterns to make sure 1stLine can extract the same useful fields from future Alert Events.
For clean JSON like the example payload, use direct JSON-style extraction where possible.
For text payloads, use Schema Patterns to choose between regex, keyPairRegex, split, json_extract, and xpath.
Test Patterns
- Click Test Pattern Extraction.
- Paste an Alert Payload.
- Click Test Patterns.
- Check whether Extracted Data contains the fields needed for routing and mappings.
- Read Extraction Steps when a field did not extract as expected.
- Compare the result with Expected Schema Fields.
Expected extracted data for the example should include:
{ "title": "CPU high on checkout-api", "status": "firing", "description": "CPU is above 90% for 5 minutes.", "labels": { "service": "checkout-api", "team": "payments", "priority": "P1", "instance": "prod-1" }}Do not continue until the extracted data contains the fields needed by your Routing Rules, Communication Rules, mappings, and Transformation Template.
Choose Fingerprint Fields
Open Fingerprint Fields and choose fields that identify the alert condition.
For the example payload, use:
labels.servicelabels.instanceThese fields stay stable across repeated CPU alerts for the same service instance.
Do not use:
startedAtstartedAt can change on every event and would prevent repeated Alert Events from updating the same Alert Instance.
If your Alert Producer sends its own stable fingerprint, use that.
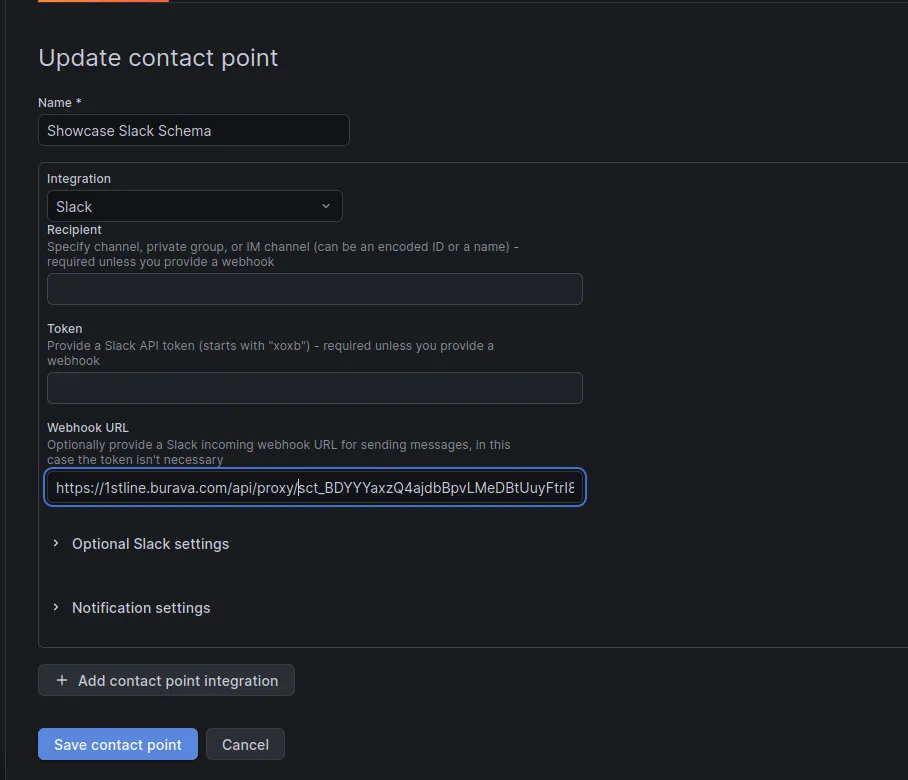
Configure forwarding
1stLine needs an Alert Receiver destination to forward the alert.
You have two choices:
- use the
forwardTovalue in Alert Producer Destination - set Default Forward To on the Alert Schema
Use forwardTo when the receiver destination should be passed by the producer request.
Use Default Forward To when the schema should always forward to the same receiver unless the producer overrides it.
The copied Alert Producer Destination can look like this:
https://1stline.burava.com/api/proxy/<schema-token>?org_uid=<org-uid>&forwardTo=<your-destination-webhook>Replace <your-destination-webhook> with the real receiver URL.
If the receiver URL contains ?, &, or other special URL characters, URL-encode it before placing it in forwardTo.
Example:
https://1stline.burava.com/api/proxy/<schema-token>?org_uid=<org-uid>&forwardTo=https%3A%2F%2Freceiver.example.com%2Fwebhook%3Fkey%3DabcIf you set Default Forward To, the producer can send to the Alert Producer Destination without a forwardTo value.
Optional: configure resolution
If the Alert Producer sends resolved events, configure Resolution Patterns.
A firing event and resolved event must produce the same fingerprint.
Firing:
{ "status": "firing", "labels": { "service": "checkout-api", "instance": "prod-1" }}Resolved:
{ "status": "resolved", "labels": { "service": "checkout-api", "instance": "prod-1" }}With labels.service and labels.instance as Fingerprint Fields, both events point to the same Alert Instance. The resolved event can resolve that instance when Resolution Patterns match status = resolved.
Optional: configure acknowledgement links
Use Acknowledgement Link Field when the Alert Receiver should show a link responders can click to acknowledge the Alert Instance.
Choose a field the receiver will actually display.
For example, if your receiver displays a links.ack field, map Acknowledgement Link Field to:
links.ackIf the receiver does not display that field, the link may be injected but responders may never see it.
Finish the schema
- Copy Alert Producer Destination from the Ingestion panel.
- Replace
<your-destination-webhook>with your real Alert Receiver destination if you useforwardTo. - Put the final value into your Alert Producer.
- Click Finish.
- Choose Close or Save as Library Schema.
Test the real flow
- Send a real test alert from the Alert Producer.
- Open Alert Instances.
- Confirm the Alert Instance appears.
- Confirm the alert reaches the Alert Receiver.
- Send the same firing alert again.
- Confirm the same Alert Instance increments Recurrences instead of creating an unrelated Alert Instance.
- If you configured resolution, send a resolved event and confirm the Alert Instance resolves.
If the Alert Instance appears as Orphan, create a Routing Rule for the Alert Schema.
If creation, extraction, or forwarding does not work, see Alerts&Schemas Troubleshooting.