Create AI Escalation Rule
Use an AI Escalation rule to decide when 1stLine by Burava sends an Alert Instance to your AI controller and what context the assistant receives.
Before you start
You need:
- an AI controller Connection
- AI Escalation enabled for the organization plan
- at least one Alert Instance to test with
If you have not connected a controller yet, follow Set Up AI Escalation Controller.
1. Open Rules
- Open AI Escalation.
- Open Rules.
- Click New Rule.
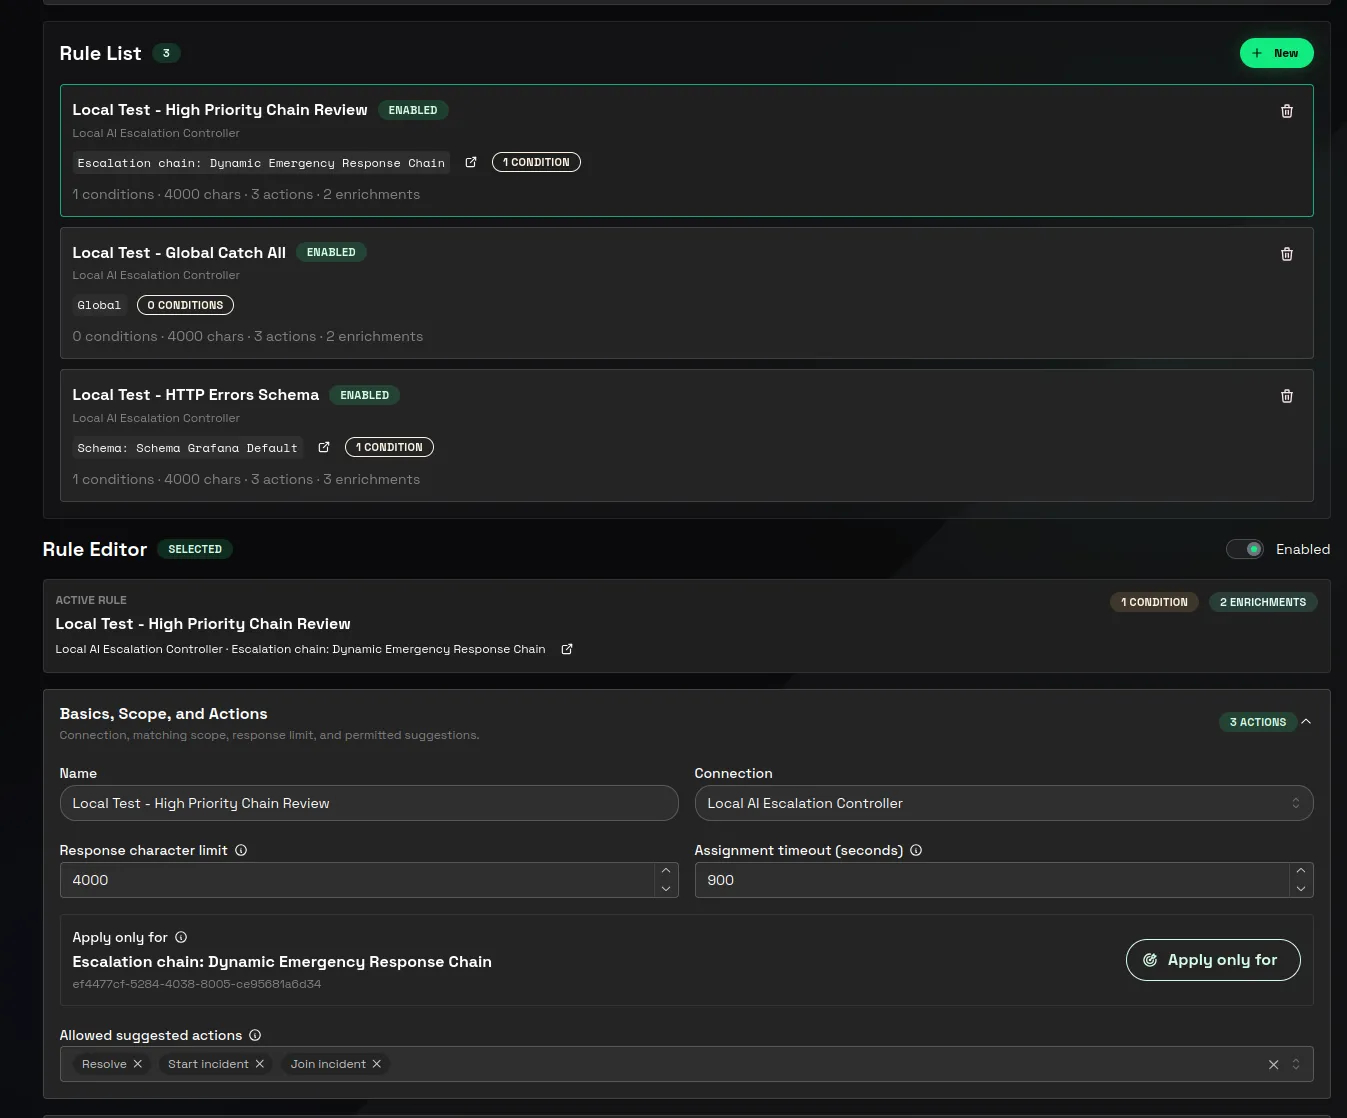
2. Fill Basics, Scope, and Actions
In Basics, Scope, and Actions:
- Enter Name.
- Select Connection.
- Set Response character limit.
- Set Assignment timeout (seconds).
- Choose the rule scope.
- Choose Allowed suggested actions.
Use a narrow scope when only one Alert Schema or Chain should use the rule. Use a broader scope only when the same investigation instructions are useful across many alerts.
Scopes work like this:
- Global can match any Alert Instance in the organization.
- Schema can match Alert Instances created through the selected Alert Schema.
- Chain can match Alert Instances connected to the selected Escalation Chain.
Rules can overlap. If a Global rule, a Schema rule, and a Chain rule all match the same Alert Instance and use the same controller Connection, 1stLine creates one AI assignment for that Connection and merges the matched rules into that assignment.
When rules merge, the assignment receives:
- enrichments from all matched rules
- the current Alert Instance context
- similar Alert Instances from the same organization and Alert Schema with the same fingerprint
- all allowed suggested action types from the matched rules
- the shortest Assignment timeout (seconds)
- the smallest Response character limit
If matched rules use different controller Connections, 1stLine creates one assignment per Connection.
1stLine adds similar alerts deterministically by fingerprint. It does not ask the assistant to search for similar alerts and it does not use semantic similarity. The assignment includes up to 10 recently created Alert Instances with the same fingerprint and same Alert Schema, excluding the current Alert Instance.
3. Add Rule Conditions
In Rule Conditions, add the Conditions that must match before 1stLine creates the AI assignment.
Use fields that your Alert Schema reliably extracts, such as priority, service, team, environment, or alert type.
For example:
priority equals P1service equals payments4. Add enrichments
In Enrichments, click Add enrichment and choose the enrichment type.
Supported types are:
- Context for a link or file path to background material
- Skill for a link or file path to a skill markdown file
- Agent for a link or file path to an agent markdown file
- MCP for MCP tools the assistant may call
- CLI for command-line tools available in the controller environment
- Note for inline instructions or context written directly into the rule
For Context, Skill, and Agent enrichments, enter either Link or File path:
- Use Link when the assistant should fetch a remote file.
- Use File path when the file already exists in the controller environment or assignment workspace.
The assistant must have the required environment variables, credentials, network access, and authorization method to fetch and read those files. Use Recommended authorization, Fallback authorization, and Auth hint to tell the assistant how access should work.
If the assistant must fetch multiple files for one piece of context, add a Note enrichment that lists the files and explains the order or purpose. Keep Context, Skill, and Agent enrichments as direct references to files.
For MCP and CLI enrichments, make sure the named tools are installed in the controller image. The rule allows them; it does not install them.
Enrichment editor fields
Every enrichment is stored in the assignment task and is visible to the assistant through .firstline/task.json. Some fields also change the generated .firstline/prompt.md or the OpenCode configuration that the controller applies for the assignment.
Fields on every enrichment
Type
Selects how the enrichment is interpreted. The type decides which fields are available and whether the controller creates OpenCode configuration from the enrichment.
Key
Stable merge identity for this enrichment. When several matching rules overlap, 1stLine merges enrichments by type and key. Keep the key stable across edits so an updated enrichment replaces the previous version instead of creating another entry.
For MCP and CLI enrichments, 1stLine can derive a key from the name when you do not enter one. For Context, Skill, Agent, and Note, choose a clear key yourself.
Label
Human-readable display name. It helps responders and reviewers understand the enrichment, but it is not the stable merge identity. Changing the Label does not replace the Key.
Context fields
Use Context for a single file or URL that the assistant should read as background material.
Link
Remote URL for a context file. The link is written into .firstline/task.json. The assistant receives it as assignment context and must fetch it using the available network access and auth.
File path
Path to a context file that already exists in the controller environment or assignment workspace. The controller adds OpenCode external-directory permission for the referenced path when needed, so OpenCode can read it during the assignment.
Recommended authorization
Preferred auth method the assistant should use when reading the Link or File path. This is sent as assignment context; it does not create credentials by itself. For example, API
Fallback authorization
Comma-separated fallback auth methods. The assistant should use these only if the recommended auth method is unavailable or fails. For example, GitHub MCP or gh cli
Auth hint
Free-form instruction for how to authenticate before reading the context. Use it for details such as required environment variables, token names, VPN expectations, or internal access rules. For example, GITHUB_TOKEN
Context enrichments do not add inline text to the prompt. If you need inline text, use Note.
Skill fields
Use Skill for a skill markdown file that the assistant should fetch and load before working.
Link and File path
Point to the skill markdown file. The assistant sees the reference in .firstline/task.json. If a File path is used, the controller adds external-directory permission for that path when needed.
Skill name
Name of the skill. The controller uses this value, or the Key when no name is present, to add an OpenCode skill permission for the assignment.
Recommended authorization, Fallback authorization, and Auth hint
Tell the assistant how to fetch and read the skill file. These fields are guidance and requirements for the assistant environment; they do not create credentials.
Skill enrichments also affect the controller prompt: the system prompt requires the assistant to include a short ## Skill Status section in response.md for every Skill enrichment, including whether the skill was fetched and used, fetched but not used, or failed.
Agent fields
Use Agent for an agent markdown file that should be available as an OpenCode agent during the assignment.
Link and File path
Point to the agent markdown file. The controller adds prompt instructions telling the assistant to fetch the markdown and copy it into .opencode/agents/<agent-name>.md before invoking that agent. If a File path is used, the controller adds external-directory permission for that path when needed.
OpenCode discovers Markdown agents from agent files, not from 1stLine. OpenCode’s official docs describe Markdown agents under ~/.config/opencode/agents/ and .opencode/agents/, and show agent configuration in YAML frontmatter. Put the subagent permissions in that Markdown frontmatter, for example mode: subagent and a permission: block. See OpenCode Agents and OpenCode Permissions.
1stLine does not inject Agent enrichments into opencode.json. Agent enrichments are references plus prompt instructions. The assistant must fetch the referenced markdown and place it in the correct OpenCode agents directory for the assignment.
Agent runtime hint
Instruction for how the assistant/controller runtime should prepare the agent markdown. The default tells the assistant to fetch the markdown and copy it into .opencode/agents/ for the assignment project.
Recommended authorization, Fallback authorization, and Auth hint
Tell the assistant how to fetch and read the agent file. The generated prompt tells the assistant to try recommended auth first, use fallback auth only when provided, and not invent auth methods.
Agent enrichments affect OpenCode permissions, but not by injecting agent definitions into opencode.json. The controller adds assignment-level task permissions using the agent Key, name-derived source, and file/link-derived name so the prepared agent can be invoked after its markdown is present in .opencode/agents/.
Example agent markdown:
---description: Investigates Kubernetes alerts and returns evidence-backed findings.mode: subagentpermission:  bash:    "*": ask    "kubectl get *": allow    "kubectl describe *": allow  edit: deny  webfetch: deny---
Use only read-only Kubernetes commands. Summarize evidence, likely cause, and next responder action.
MCP fields
Use MCP when the assistant should be allowed to use a specific MCP server during the assignment.
MCP name
Stable MCP server name. The controller uses this as the OpenCode mcp server key. Tool names are later prefixed with this server name by OpenCode.
Tools
Comma-separated MCP tool names the assistant may call. When this list is present, the controller adds an OpenCode tool allowlist: tools matching <mcp-name>_* are disabled, and only the named <mcp-name>_<tool> entries are enabled. It also adds matching OpenCode permissions for those tools.
Leave Tools empty only when you intentionally want the configured MCP server to expose its normal tool set.
Required env
Comma-separated environment variable names required by the MCP server. The controller adds those names to the OpenCode MCP server configuration as {env:NAME} placeholders. The variables must exist in the controller environment at runtime.
MCP mode
Choose how the MCP server is configured:
- Command builds an OpenCode local MCP server entry from Command, Args, and Required env.
- JSON passes a static JSON MCP server configuration into OpenCode and then adds any Required env placeholders to that configuration.
Command
Executable used to launch the MCP server in Command mode. The binary must already exist in the controller image.
Args
Comma-separated command arguments for the MCP server process.
Working directory
Directory where the controller should launch the MCP command. Use this when the MCP server expects local config or repository-relative files.
Timeout seconds
Maximum time for the MCP command operation where supported by the command configuration.
JSON config
Static JSON object for the MCP server in JSON mode. Use this when you need to provide a full remote or local MCP configuration instead of a command split into fields.
MCP enrichments affect OpenCode configuration directly: they add or update the assignment-specific mcp, tools, and permission entries before the controller starts the OpenCode session.
CLI fields
Use CLI when the assistant should be allowed to run a command-line tool during diagnostics.
CLI name
Stable name for the CLI integration. If Command is blank, the controller can use this name as the command permission target.
Required env
Comma-separated environment variable names that must exist before the CLI can run. This is sent in the assignment task so the assistant can verify expected environment. It does not create the variables.
Command
Executable or command name the assistant may run. The binary must already exist in the controller image.
Args
Comma-separated default arguments for the command.
Working directory
Directory where the command should run.
Timeout seconds
Maximum seconds the command should run, where supported by the command setup.
Auth hint
Free-form authentication instructions for the CLI. Use it to describe required profiles, token environment variables, kubeconfig context, cloud account, or other runtime access.
CLI enrichments affect OpenCode permissions. The controller adds bash permissions for the command and for the command with the configured arguments. The assistant still needs the actual CLI and credentials in the controller environment.
Note fields
Use Note for inline instructions or context.
Note body
Free-form text sent directly in the assignment task. Use it for short runbook steps, multi-file fetch instructions, warnings, or guidance that should not be stored as a separate file.
Note enrichments do not create OpenCode tool permissions or MCP configuration. They affect the assistant by becoming direct assignment context.
5. Save the rule
Click Create rule.
If you are editing an existing rule, click Save rule.
6. Test from an Alert Instance
- Open Alert Instances.
- Open an Alert Instance that should match the rule.
- Click Escalate to AI.
- Open the AI assignment link from the Alert Instance details page, or open AI Escalation Assignments.
- Confirm the assignment shows the expected matched rule and response.
Related pages
OpenCode is a third-party brand. Burava does not own, represent, or speak for OpenCode.